How Windows Manage Water: Transcript & Graphics
This is the transcript and graphics from the "How Windows Manage Water" course video. To watch the full video, please visit our course article.
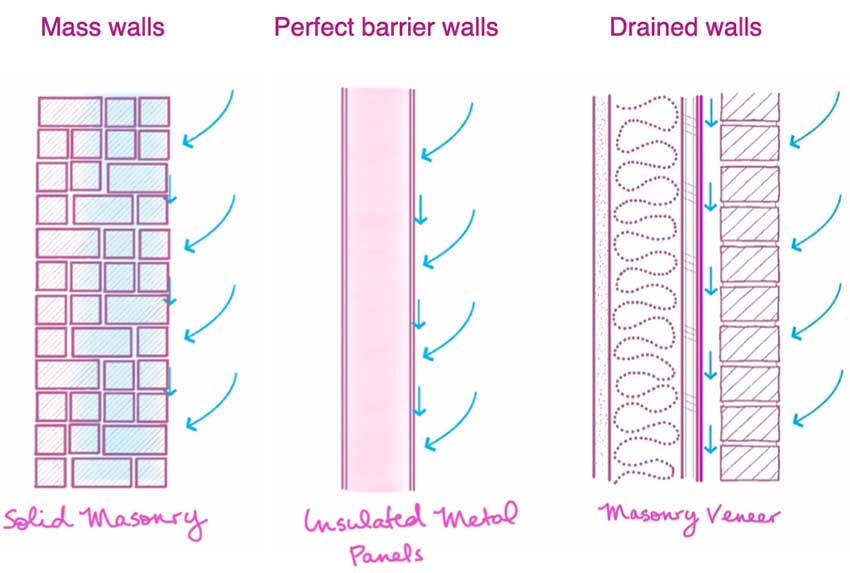
To understand how windows manage water is really to understand the concept of the two-stage seal. And I find it’s most helpful to introduce this concept in the context of walls, not windows. There are three different ways that walls can manage water. There’s the Storage approach, the exclusion approach and the WRB and drainage approach.
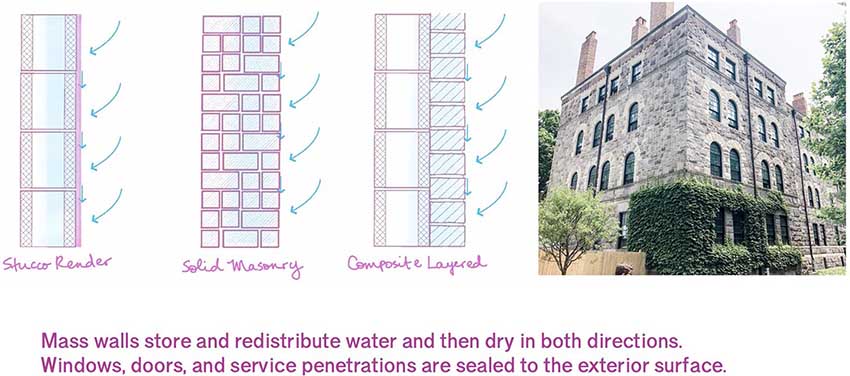
The storage approach is how mass walls manage water. It involves the wall absorbing water, redistributing that water, and then releasing it by drying. These walls work because they’re made out of non-moisture sensitive materials that have a tremendous capacity to safely store water. Basically we let them get wet and then let them dry.
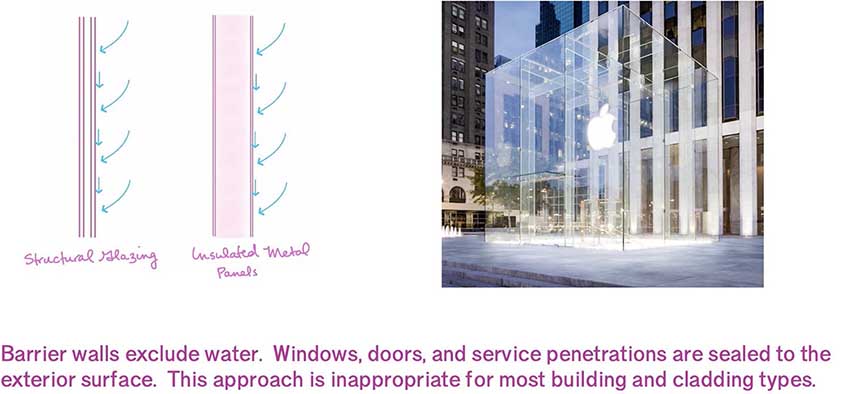
The second way walls can manage water is the exclusion approach. These walls are called barrier walls or perfect barrier walls. And they work by being perfect or very near perfect at blocking water entry at their outermost surface. This is the least common strategy – but it isn’t by any means rare. It’s just that the materials that we like to build with for cost and aesthetic reasons, tend to not lend themselves very well to be detailed to perfectly block water for the entire service life of the building.
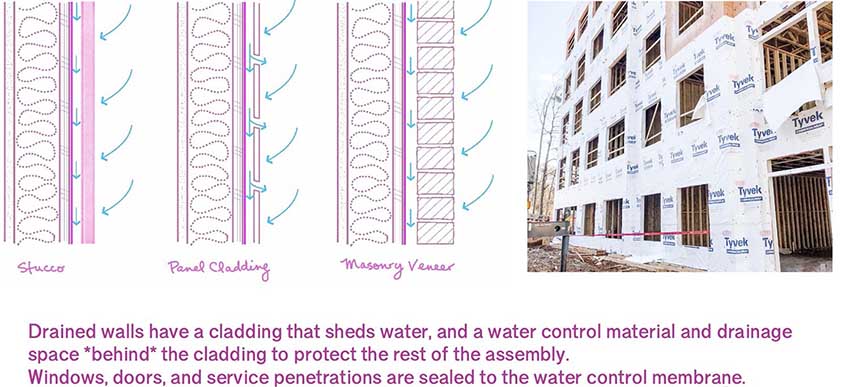
The drainage and WRB approach is how most framed walls manage water. These walls have a cladding that sheds water, an air space behind that cladding for drainage and drying, and a water control membrane behind that to protect the rest of the assembly. WRB stands for water resistive barrier and it’s what the building code calls the water control membrane. This water management strategy allows us to build lightweight framed walls – as opposed to our heavy masonry walls – and we can build them out of moisture sensitive materials like wood framing and sheathing, cellulose insulation and paper faced drywall…as long as we protect those moisture sensitive materials from excessive wetting by having a water-shedding cladding, a space for drainage and drying, and our WRB, all three of which work together as a system.
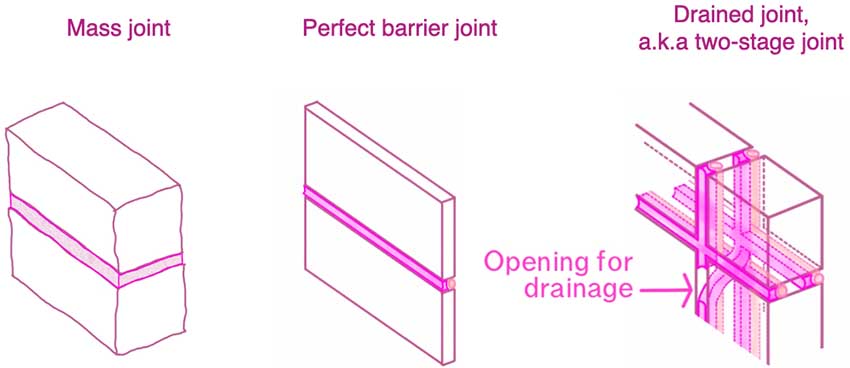
Okay, but our topic today is windows. Why are we even talking about walls? Because the same three approaches to water management in walls, also apply to how building joints manage water. We can have mass joints, perfect barrier joints, and drained joints. And they work the same way their wall counterparts work. Mass joints safely store and redistribute water as they dry out, perfect barrier joints perfectly block water – the example is the classic backer rod and sealant. And drained joints have two layers of protection with a drainage space in between.
It’s important to point out that all three of these approaches to water management at building joints work… it’s just a question of how appropriate each one might be in any given context. When that context is windows in North American framed construction, the best approach is nearly always the drained approach. We typically use the term “drainage” when we’re talking about walls, but when we’re talking about windows, we typically describe the joint as a two-stage seal. Although it’s not uncommon to call it a drained or a weeped system.
So let’s talk more about what this two-stage approach actually looks like in windows. First of all, what we’re usually talking about – or arguing about – is not actually the window, but the window to wall interface. It’s the joint between the window and the wall. It’s the window manufacturer’s responsibility to make sure their window performs however it’s designed to perform, but it’s the architect’s responsibility to design the window-to-wall interface. This is an important distinction. When windows are tested in the laboratory to make sure they meet whatever standards they’re supposed to meet, the manufacturers are not testing the window to wall interface. They’re only testing the window. And typically the way they test the window is by installing it in a test wall and applying a thick, perfect sealant joint around all four sides – a perfect barrier seal – and then they do the tests. They don’t care how the wall manages water. They don’t care how the window-to-wall interface manages water. And they don’t care what it looks like. It’s not their job. That’s our job.
So let’s walk through the detailing of a hypothetical residential flanged window in a wood framed wall. We start with an opening in the framed wall. This is called the rough opening or R-O. And in this example, we’re going to assume that we’re using a fluid membrane as our water control membrane for the wall. The concept of the two-stage seal is exactly the same no matter what we’re using for the water control membrane, but the detailing is more complicated with mechanically attached membranes and I don’t want to get us sidetracked – I really want to focus on the concept of the two-stage seal and why it’s so great at windows.
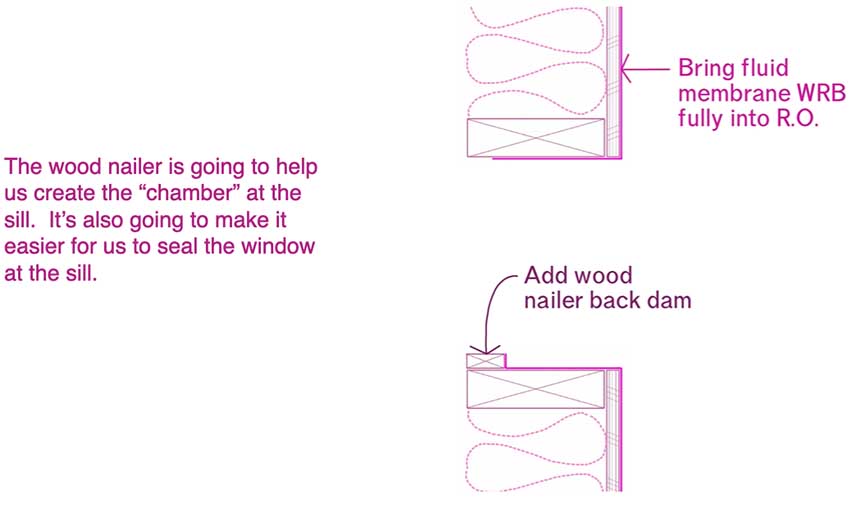
So the first thing we want to do is add a little wood nailer as a back dam. This step isn’t mandatory, but it’s a good idea but the reasons are beyond the scope of this discussion. Next we, want to bring the fluid membrane into the rough opening on all four sides. The idea here is that we want to protect the wall. This part isn’t about the window. It’s about the wall. And we’ve built this wall out of moisture sensitive materials. We want to protect those materials. The most vulnerable part of our wall is, of course, the sill. And the building code only requires that we protect the sill. But I recommend – and it’s not uncommon – to protect the entire opening. Particularly the cut edges of the sheathing. Those can get water damaged pretty easily.
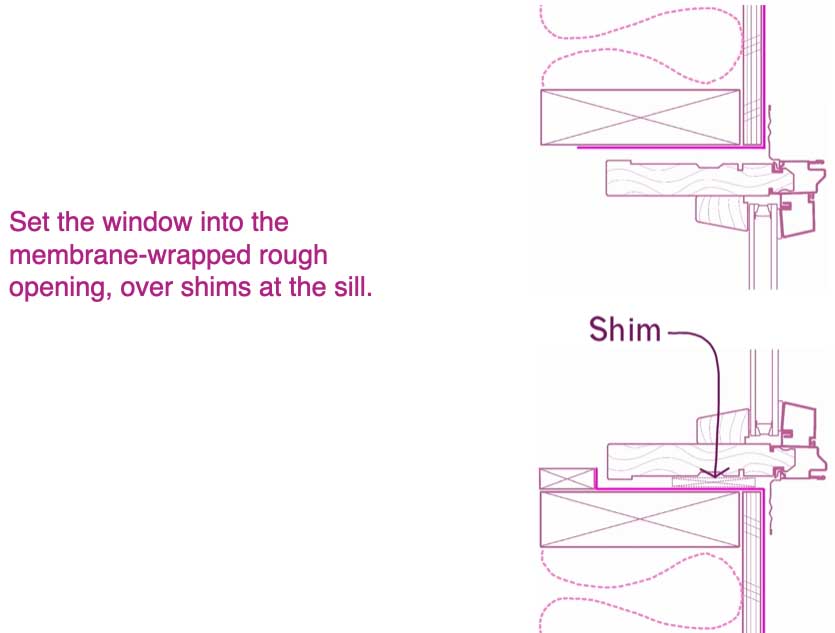
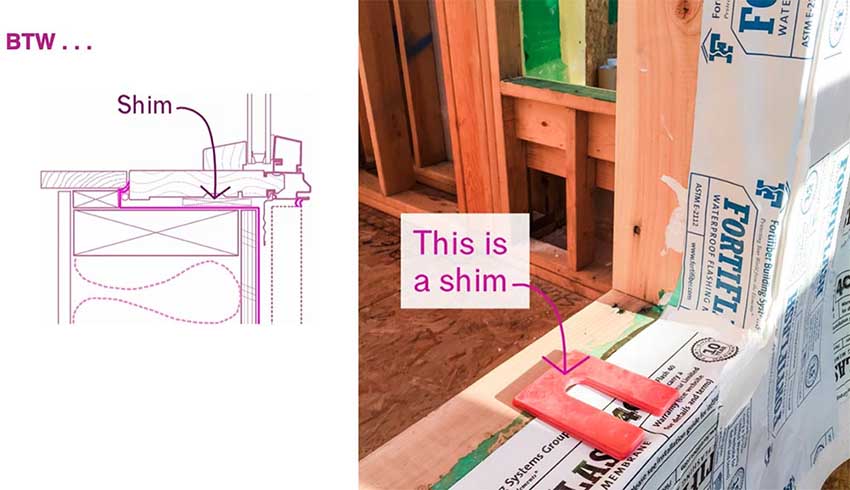
Okay now that our wall is protected, we want to set the window into the opening. We typically set it on what are called shims. The shims do a couple important things for us. The first is that our framing will never be completely perfect and the shims help us level out the window so that even if the framing is a bit wonky – and it always is – the windows are level, and aligned with each other. The other thing shims do is they elevate our window a bit. This is going to be important to us when we go to install our two-stage seal because we need to physically make room for the sealant joints. When windows are too tight to the framing, it makes it harder to get our seals installed properly.
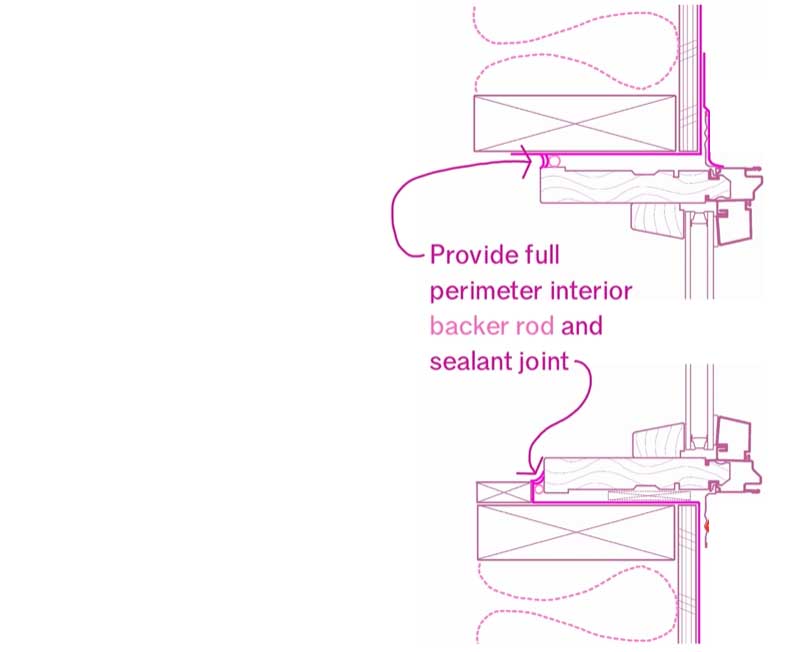
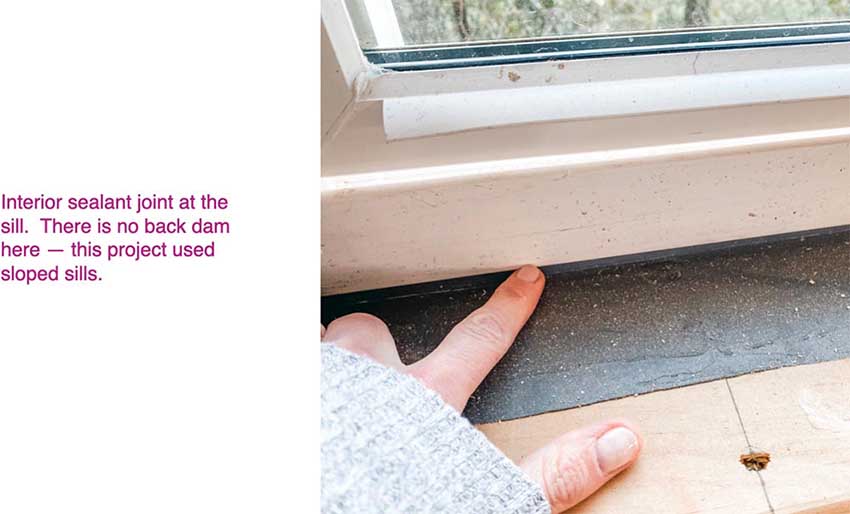
Now that our window is set in the opening, it’s time to get this two-stage seal installed. On the inside, we’ll install a full perimeter backer rod and sealant joint. This seal needs to be completely continuous. You’ll also notice that in making it completely continuous we’re also completing our air barrier at our windows. When we brought our fluid membrane into the rough opening, we brought our air barrier into the opening. And now we’re sealing our air barrier to the interior portion of our window frame. We now have an airtight enclosure. Sometimes we make this seal with expanding foam or even special tape, rather than a backer rod and sealant. My preference is to use sealant though. I find it’s easier to review it for continuity after it’s been installed. With foam, you never really know how well it’s been done. All three materials are common and acceptable though. I usually defer to the installers’ preferences. Whatever they’re most comfortable using is fine with me. The only caveat to that is that if they’re going to use expanding foam, they should still use backer rod. We don’t want the foam to fill up the entire cavity, because we want to preserve the ability of the system to drain.
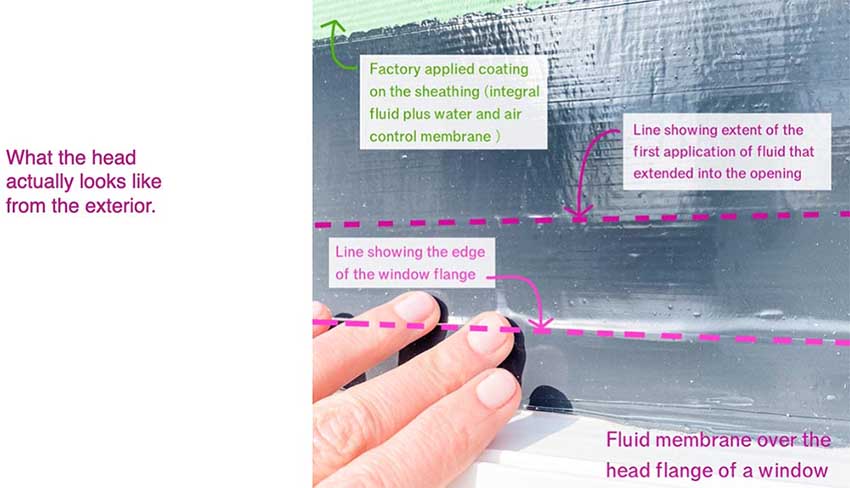
And speaking of drainage, on the exterior we also want to install a seal. I should point out here that even though I’m talking about it second, the exterior seal is almost always installed first. In unflanged windows, that outer seal is similar to the inner seal, it’s backer rod and sealant. But usually we’re using flanged windows and for those we use fluid or self-adhered membrane to achieve the outer seal. Here’s what that actually looks like on a real window. The lines on the drawing make it seem like there’s a lot of material build-up, but in practice that’s not really the case.

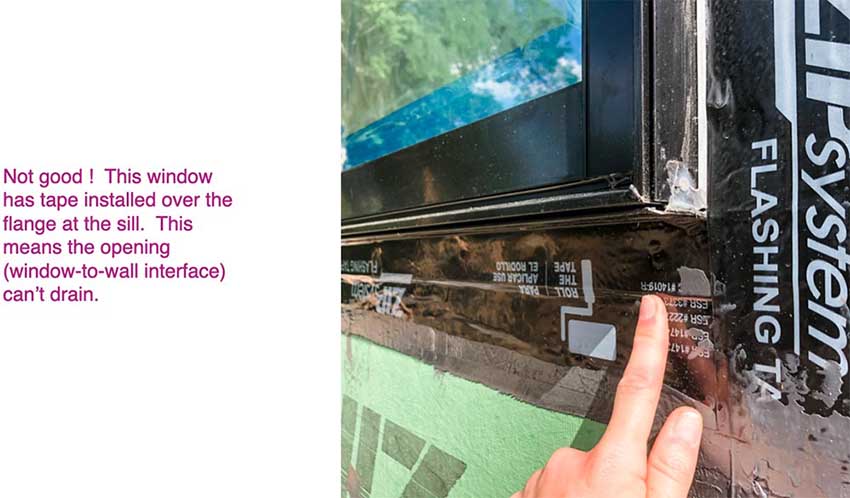
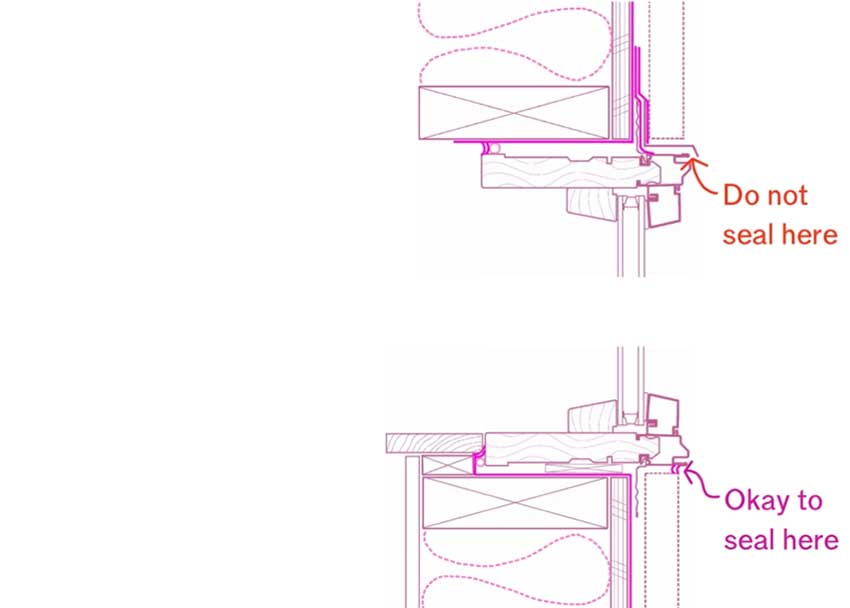
The trick with the outer seal is that we want it to drain at the sill. Practically speaking this means we tape the window flange at the head and the jambs, and we simply omit the tape at the sill. Here’s what it looks like for the flange to not be taped. By omitting the tape, we’re providing a very small space for water to drain into the wall cavity behind that flange. And that’s it. We are now what’s called “dried-in”. Our two-stage seal is complete. Our detail isn’t quite finished – here’s an illustration showing the secondary head flashing and some kind of generic cladding.

And here’s an image showing an incorrect installation, where the sill flange has been taped.
This two-stage seal is particularly wonderful because – just like our drained wall – the elements work together to manage water. The outer seal is water shedding, the inner seal gives us our continuous air control, and the space between provides physical room for drainage.
Before we conclude, though, I’d like to address a few frequently asked questions about this approach. The first is that if we’re letting water out at the sill, can’t we also let water in? And isn't that risky, especially in, say, coastal areas. This is a fair concern. But the answer is that this two-stage drained approach is actually more important in high-risk areas, not less important. I’d also like to point out that the place we’re providing drainage is behind the cladding. This is what’s called a concealed weep. As opposed to an exposed weep. And actually, speaking of exposed weeps, take a closer look at a lot of window systems and you’ll see that many of them have exposed weeps – they’ve been designed with the same two-stage approach that we’re applying to the window to wall interface. Anyway, we’re draining both the window and the wall into that cavity behind the cladding. You’d be a fool to seal up the weeps in your cladding system because you were worried about rain getting in. Eliminating drainage would very obviously make a wall perform worse, not better. And it’s the same with windows.
The second most common objection to the two-stage approach is that windows simply shouldn’t leak and therefore drainage is unnecessary. I am sorry to tell you that even well-made windows leak. This is why we flash openings in the first place. Windows have a lot of complicated internal joinery that’s difficult to seal even in factory conditions. This same joinery can get stressed during transport to the job site, and also during the actual installation of the window into the rough opening. Even after the window has been installed, it sees a lot of abuse in service. It will be exposed to wind, rain, UV, birds. It’s not unreasonable to anticipate that any one of these things would cause a window to leak.
I’d also like to point out that this is just the window itself. The window to wall interface can also leak. What are the odds that the installation crew is not one hundred percent perfect at detailing the window? And what are the odds that even a perfect detail will remain perfect throughout its service life?
Finally, windows don’t come with some sort of no leak guarantee. No manufacturer would make such a blanket statement. Windows are rated based on how they perform when exposed to very specific stresses in laboratory settings. What are the odds that the actual stresses your window experiences in service exactly match the laboratory conditions the window was tested under?
I find this line of thinking is just breathtakingly ridiculous. It’s like saying you’re a really good driver so you don’t need to wear a seatbelt. Actually, it’s not even that! It’s like a driver telling her passenger not to put on a seatbelt and just trust that she’s a great driver. And that everyone else is too.
We know that even responsible drivers driving well made, well maintained cars get into accidents. Which is why there are seatbelts and airbags and blind spot alerts, and automatic breaks, and .... insurance!
The beauty of the two-stage approach is that we’ve designed a system that isn’t dependent on perfection.
Keywords: windows, water management, water control, two-stage seal, building science, building enclosure, drainage, window system, glazing
About Building Science Fight Club